EMF
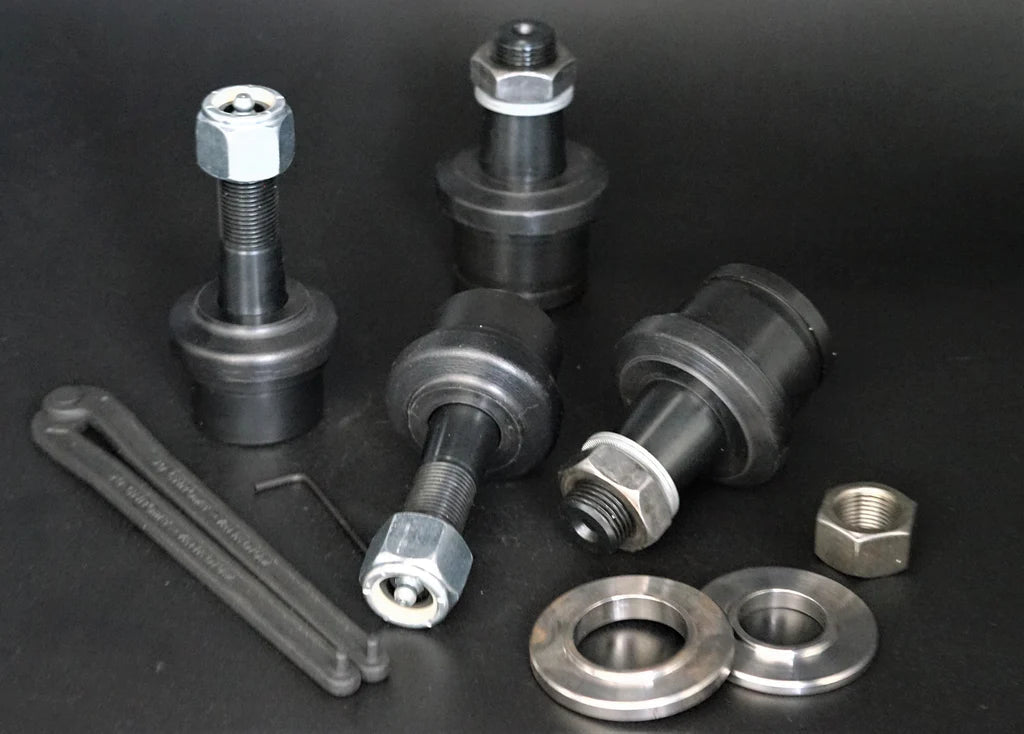
EMF 1994-1999 DODGE RAM 2500/3500 AND 1999-2019 FORD SUPERDUTY DANA 60 SET OF 4 *OVERSIZED*
EMF 1994-1999 DODGE RAM 2500/3500 AND 1999-2019 FORD SUPERDUTY DANA 60 SET OF 4 *OVERSIZED*
SKU: 8607.1-80026.1-KIT
CONTACT US FOR AVAILABILITY
Couldn't load pickup availability
** SET OF 4 ** OVERSIZED EMF Dana 60 Upper and Lower Ball Joints
FITS:
- 2000-2005 Ford Excursion
- 1992-1997 Ford F350 Gas & Diesel
- 1999-2019 Ford F250 & F350 Superduty
- 1999-2004 Ford F450 Superduty
- 2011-2019 Ford F450 Superduty
- 1999-2004 Ford F550 Superduty
- 1994-1999 Dodge Ram 2500/3500 4WD
The Install Tools for the Upper and Lower Ball Joint are to avoid damaging the Rings when pressing the ball joints into the knuckle using a suitable Ball Joint Press. They are included with each set of 4 purchased. Pics below show how the Installation Washer is used. These are MANDATORY to avoid damage to the ring, we will not warranty damaged rings due to not using the provided washers:


EMF DANA 60 BJ TIGHTENING PROCEDURE
THESE STEPS ARE MANDATORY FOR EVERYONE TO FOLLOW. MECHANIC OR HOME INSTALL. FAILURE TO FOLLOW THESE PROCEDURES WILL RESULT IN IMPROPER INSTALLATION AND YOUR TRUCK WILL NOT MOVE CORRECTLY. EMF IS NOT RESPONSIBLE FOR IMPROPER INSTALLATION BECAUSE THE INSTRUCTIONS WEREN’T READ - SO READ THESE PROCEDURES AND FOLLOW THEM!!! (A COPY OF THESE INSTRUCTIONS WILL ALSO BE INCLUDED WITH YOUR BALL JOINTS)
TIGHTENING PROCEDURE – AFTER REMOVAL OF OLD BALL JOINTS
☐ After removal of old ball joints, remove wedge collar from housing. Clean collar and housing.
☐ Clean lower housing / tapered hole of any grease and rust. DO NOT USE ABRASIVES TO CLEAN!
☐ Clean rust and dirt from knuckle.
☐ Install Ball Joints using the appropriate supplied protection washers (included – see picture above) on the face of the ball joints to prevent damage to the rings when pressing in with ball joint press. The washers are not needed after install – they can be thrown away or kept for possible future use if desired.
☐ Use Anti-Seize and cover the wedge collar (OUTSIDE OF THE COLLAR, NOT THE INSIDE). **IMPORTANT ** MAKE SURE THE ANTI-SEIZE DOES NOT GET INTO THE TAPER
☐ Loosely place wedge collar in the housing.
☐ Slide the knuckle into place and install lower Nord-Lock locking washer and 7/8”-14 nut on lower pin.
☐ Torque Lower Nut to 150 ft. lbs
☐ Rotate Knuckle side to side and make sure it moves freely. **IF THE KNUCKLE DOES NOT MOVE FREELY, SEE TROUBLESHOOTING GUIDE BELOW**
☐ Take the NON-NYLOCK ¾”-16 Install Nut and Torque upper ball joint pin to 90 ft lbs.
☐ KNUCKLE WILL BE TIGHT. Use a socket or pipe that will fit over the Upper Ball Joint Nut and sit flat on wedge collar.
☐ Tap Down with a hammer, Knuckle will loosen.
☐ Re-Torque Upper Ball Joint Nut to 90 ft lbs
☐ Rotate Knuckle back and forth, ensuring a smooth motion.
☐ Remove the NON-NYLOCK Install Nut with a RATCHET ** DO NOT USE AN IMPACT OR THE PIN WILL UNSEAT FROM THE HOLE AND YOU WILL HAVE TO START OVER AGAIN **
☐ Install ¾-16 Nylock Nut on the Upper Ball Joint and torque to 110 ft lbs.
GREASING PROCEDURE – AFTER INSTALL OF NEW BALL JOINTS
☐ Grease the LOWER Ball Joints first until the grease gun starts to become firm.
☐ Then grease the UPPER Ball Joints until the grease gun becomes firm
☐ Grease the LOWER Ball Joints again for a couple more pumps
☐ Rotate the knuckle side to side to distribute the grease evenly throughout the ball joints. The knuckle should go from stiff and hard to move, to easier to move side to side freely.
☐ Now you want to repeat the steps again, starting with greasing the lower ball joint first, as many pumps as you can get. Then the upper ball joint (if you can get any more in).
☐ Cycle the knuckle back and forth until it frees up and grease is evenly distributed within the joint. If the knuckle feels too stiff, depress the grease fitting to relieve pressure on the joint.
☐ If everything feels good, proceed with re-assembly of the axle as per your manufacturer’s instructions.
TROUBLESHOOTING
☐ IF IT IS TIGHT, UNDO. Separate knuckle from housing, remove collar from housing and start over!
☐ Make sure there is a gap between the wedge collar and the housing.
Share:


